How to take perfect participant images
Last updated: 08/03/2023.If you are a photographer for John Kelly Photos, please familiarize yourself with this guide. All photographers are expected to be familiar with this guide and reproduce these shots at our events in order to produce consistent photographs across all races. While there are many ways to take a good race photograph, we want a standardization across all our events so our clients and their event participants know exactly what they are getting ahead of time.
The technique
Regardless of the shooting style we assign you from our shooting guide, your shots should adhere to the following techniques. Unless otherwise discussed with your team leader or coordinator, each shot should be taken with a 70-200mm f/2.8 lens @ f/4 aperture, absolute minimum shutter speed 1/800th of a second. Please ensure all your other camera settings comply with our camera setting checklist.
- SHARP FOCUS This goes without saying, but the focus should be on the participants face. We shoot at exactly f/4 aperture and put the focus point on the participants' face. Do not use the face/eye selection many newer cameras have - this will not work well with our events, and you will not produce the images we want. Please manually set your focus point on the subject's face. If you are framing your shots correctly, you shouldn't really need to move the focus point much.
- PROPER FRAMING All your images should have even negative space (the padding around the edges of the image) around the frame. A subject should being centered correctly. Very importantly, this also means you are not inadvertently cropping off any part of the subject's body.
- LEVEL HORIZON An almost perfect photo can be ruined by uneven horizons. Make sure your horizons are level in each shot.
- ISOLATION You must isolate the subject. Unless a group is clearly associated with each other, each participant in a clump should be individually photographed.
Sharp Focus
Sometimes it is good to go back to the basics - let's review some techniques for autofocusing during action events:
- Make sure you are manually selecting your focus point. Do not manually focus your lens. Do not use eye tracking on mirrorless cameras- this too-often struggles to track an individual in some of our more dense races. You should being using your d-pad or camera wheel to move the focus point to the subject's face. Realistically, if you are framing your photos correctly, you really shouldn't need to move this much once the focus point is properly selected.
- Make sure you have continuous autofocus enabled. Single autofocus for obvious reasons will not work - you'll likely get your first shot good and the rest in the burst will be out-of-focus.
- Use back-button focus. If you are unfamiliar with this concept, there are thousands of YouTube videos we can direct you to. There is almost no reason to not use it for these events, and using it almost always correlates to more in-focus shots after an event.
- Understand your camera and lens' abilities. Understand that there is a difference in phase-detection autofocus and contrast based autofocus, and given current technology, while they both work really well for most of what we do, they DO in fact have different weaknesses and strengths. Some mirrorless camera systems excel compared to their DSLR counterparts in low light focusing capabilities and tracking motion orthogonal to direction of photograph, but struggle with subjects rapidly approaching the camera (running straight at the camera) when they are very close. Don't assume because you have the flagship of some brand's line up that your camera or lens doesn't struggle with some task in autofocusing.
Proper Framing
Proper framing includes a lot of things, but most importantly you should have even negative space on top/bottom and left/right sides of image. It doesn't matter what type of shot you are doing, unless specifically assigned to shoot off center (IE rule of thirds on landscape shots) you should have equal negative space on each side of the image, and equal negative space on the top and bottom of the image. That means the area above the subject's head and the top of the frame is the same as the area below their feet and the bottom of the frame. Same applies with each side of their body/arms.
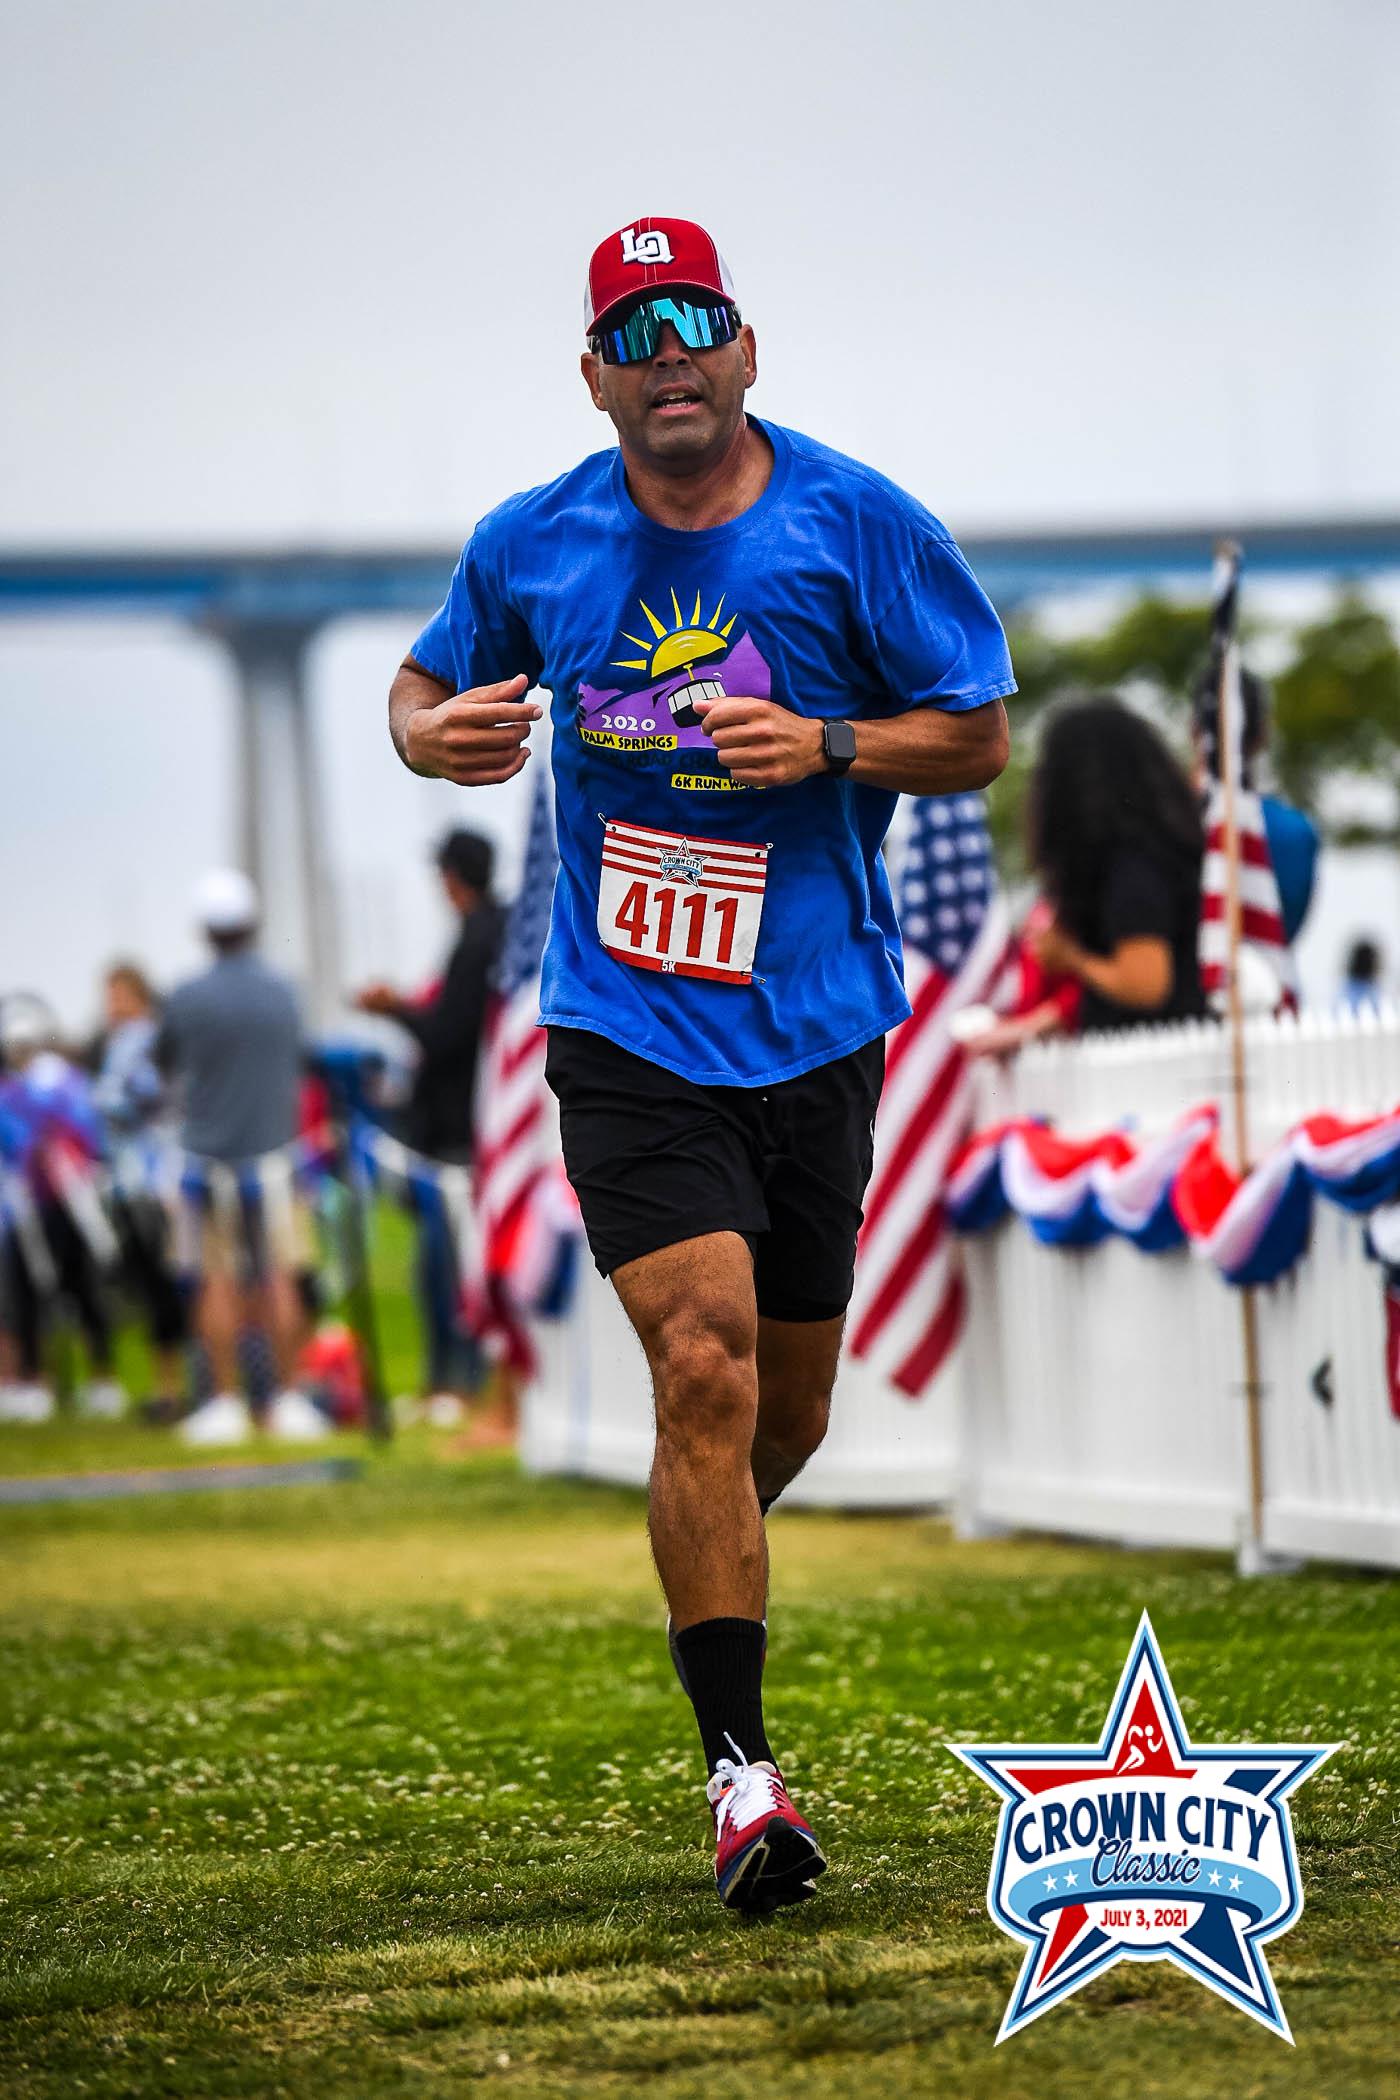
Even padding image
Example of even negative space around the runner. Notice, the spacing does not need to be the same on the top/bottom as it is on the sides.
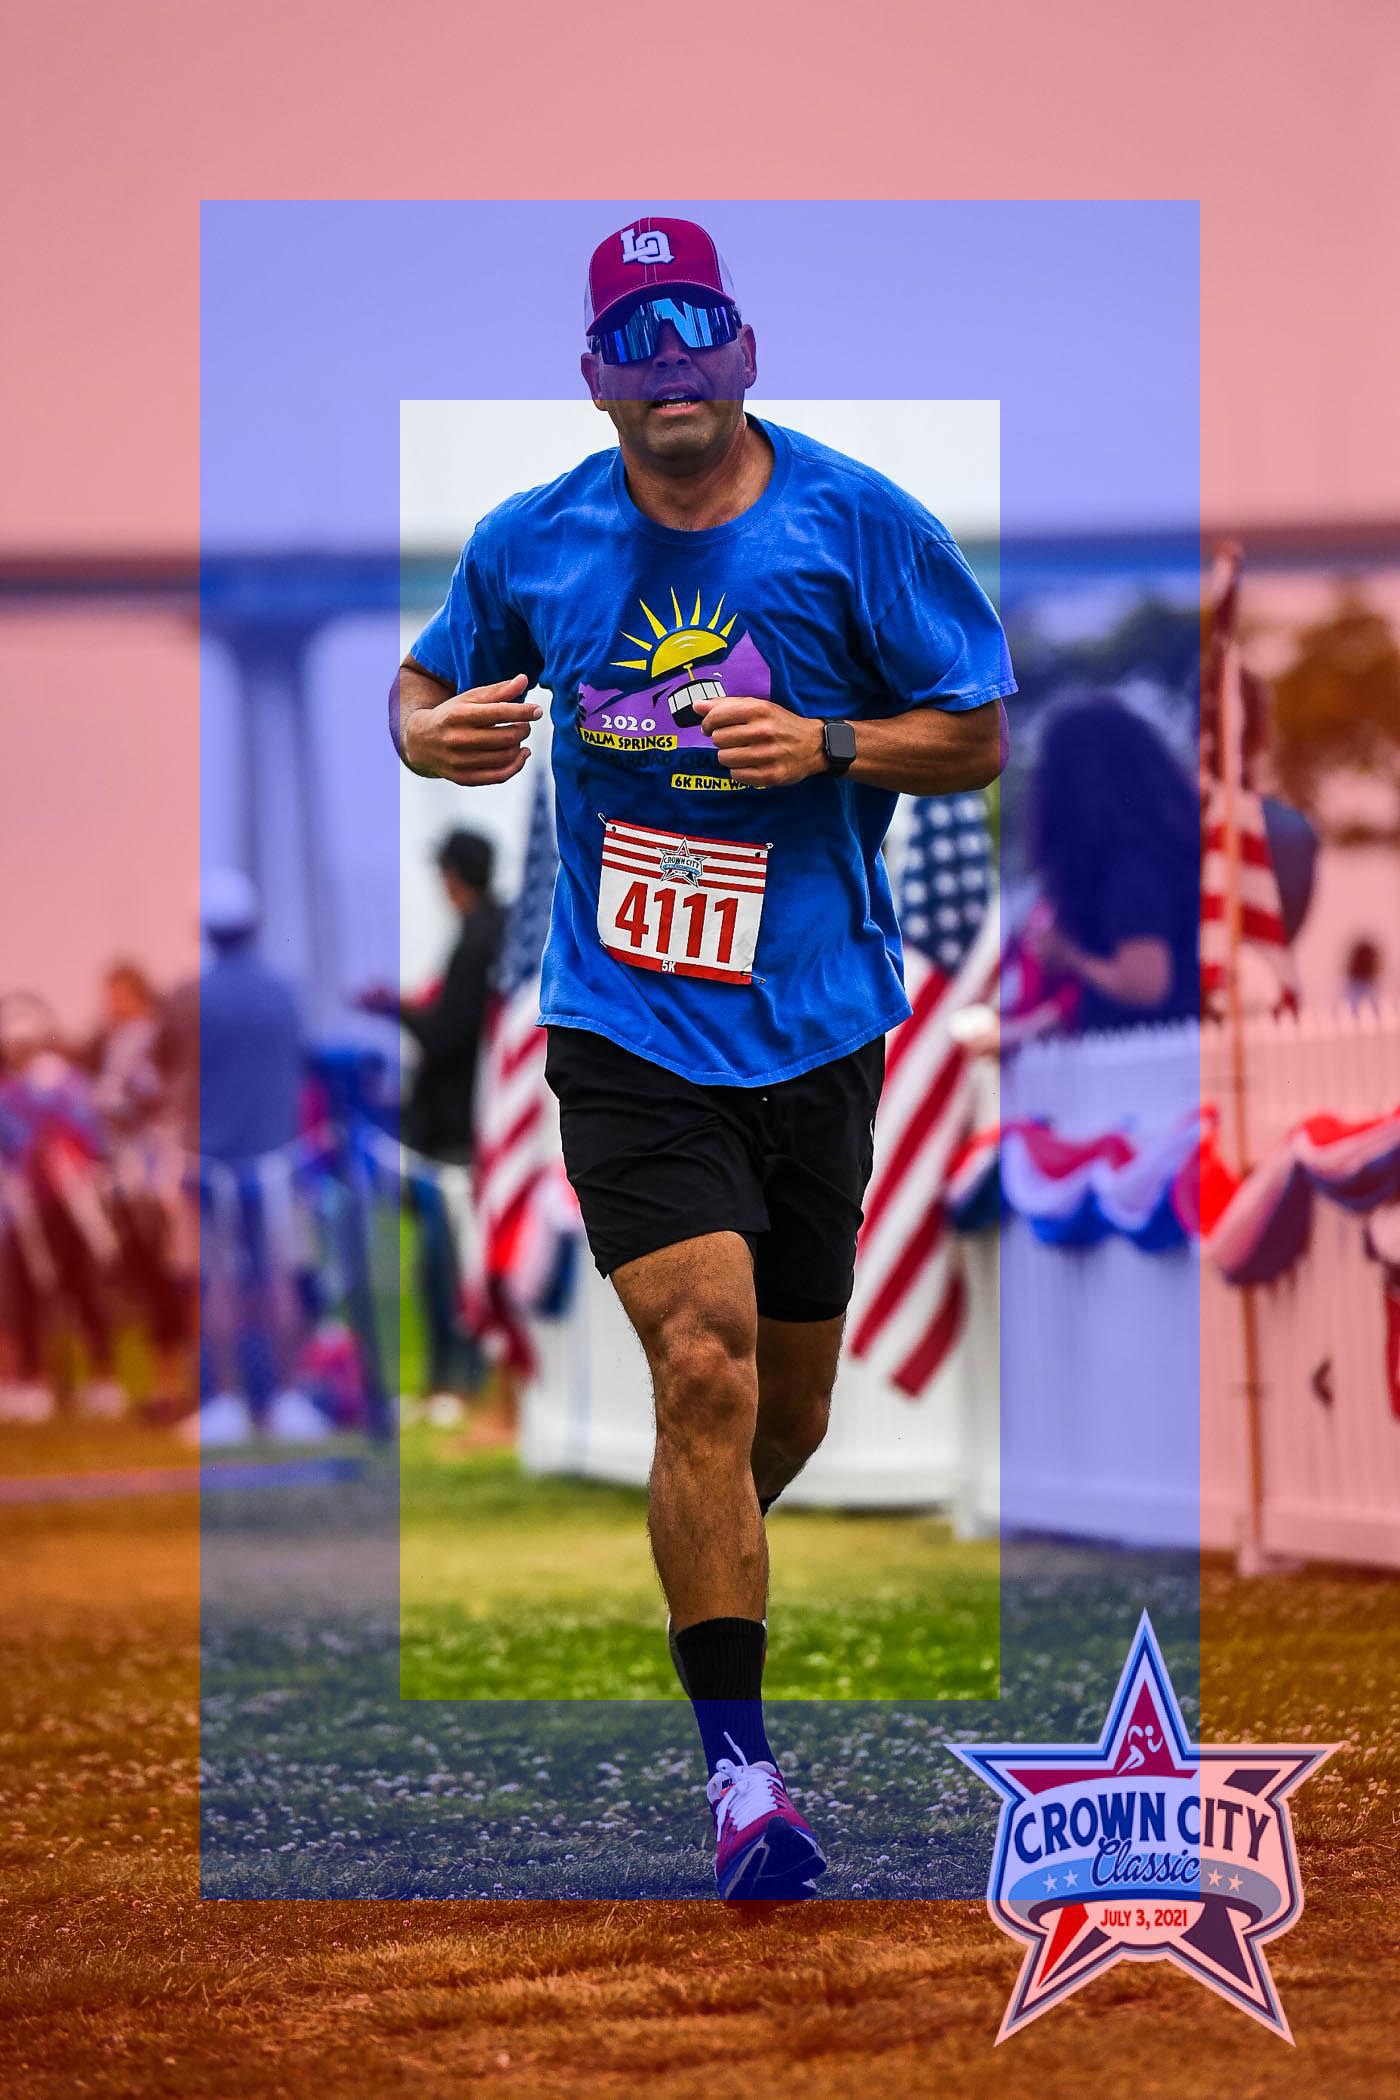
Even padding with measurements
With the measurement lines, it is easy to see that each side of the runner is roughly even distance from its respective side of the frame. The top of the runner's head is also almost exactly the same space from the top of the frame as the runner's foot from the bottom of the frame.
There is an exception to this rule with our upper body tight shots (see shooting guide for more on this). These shots should have the same padding on each side of the frame and the top.
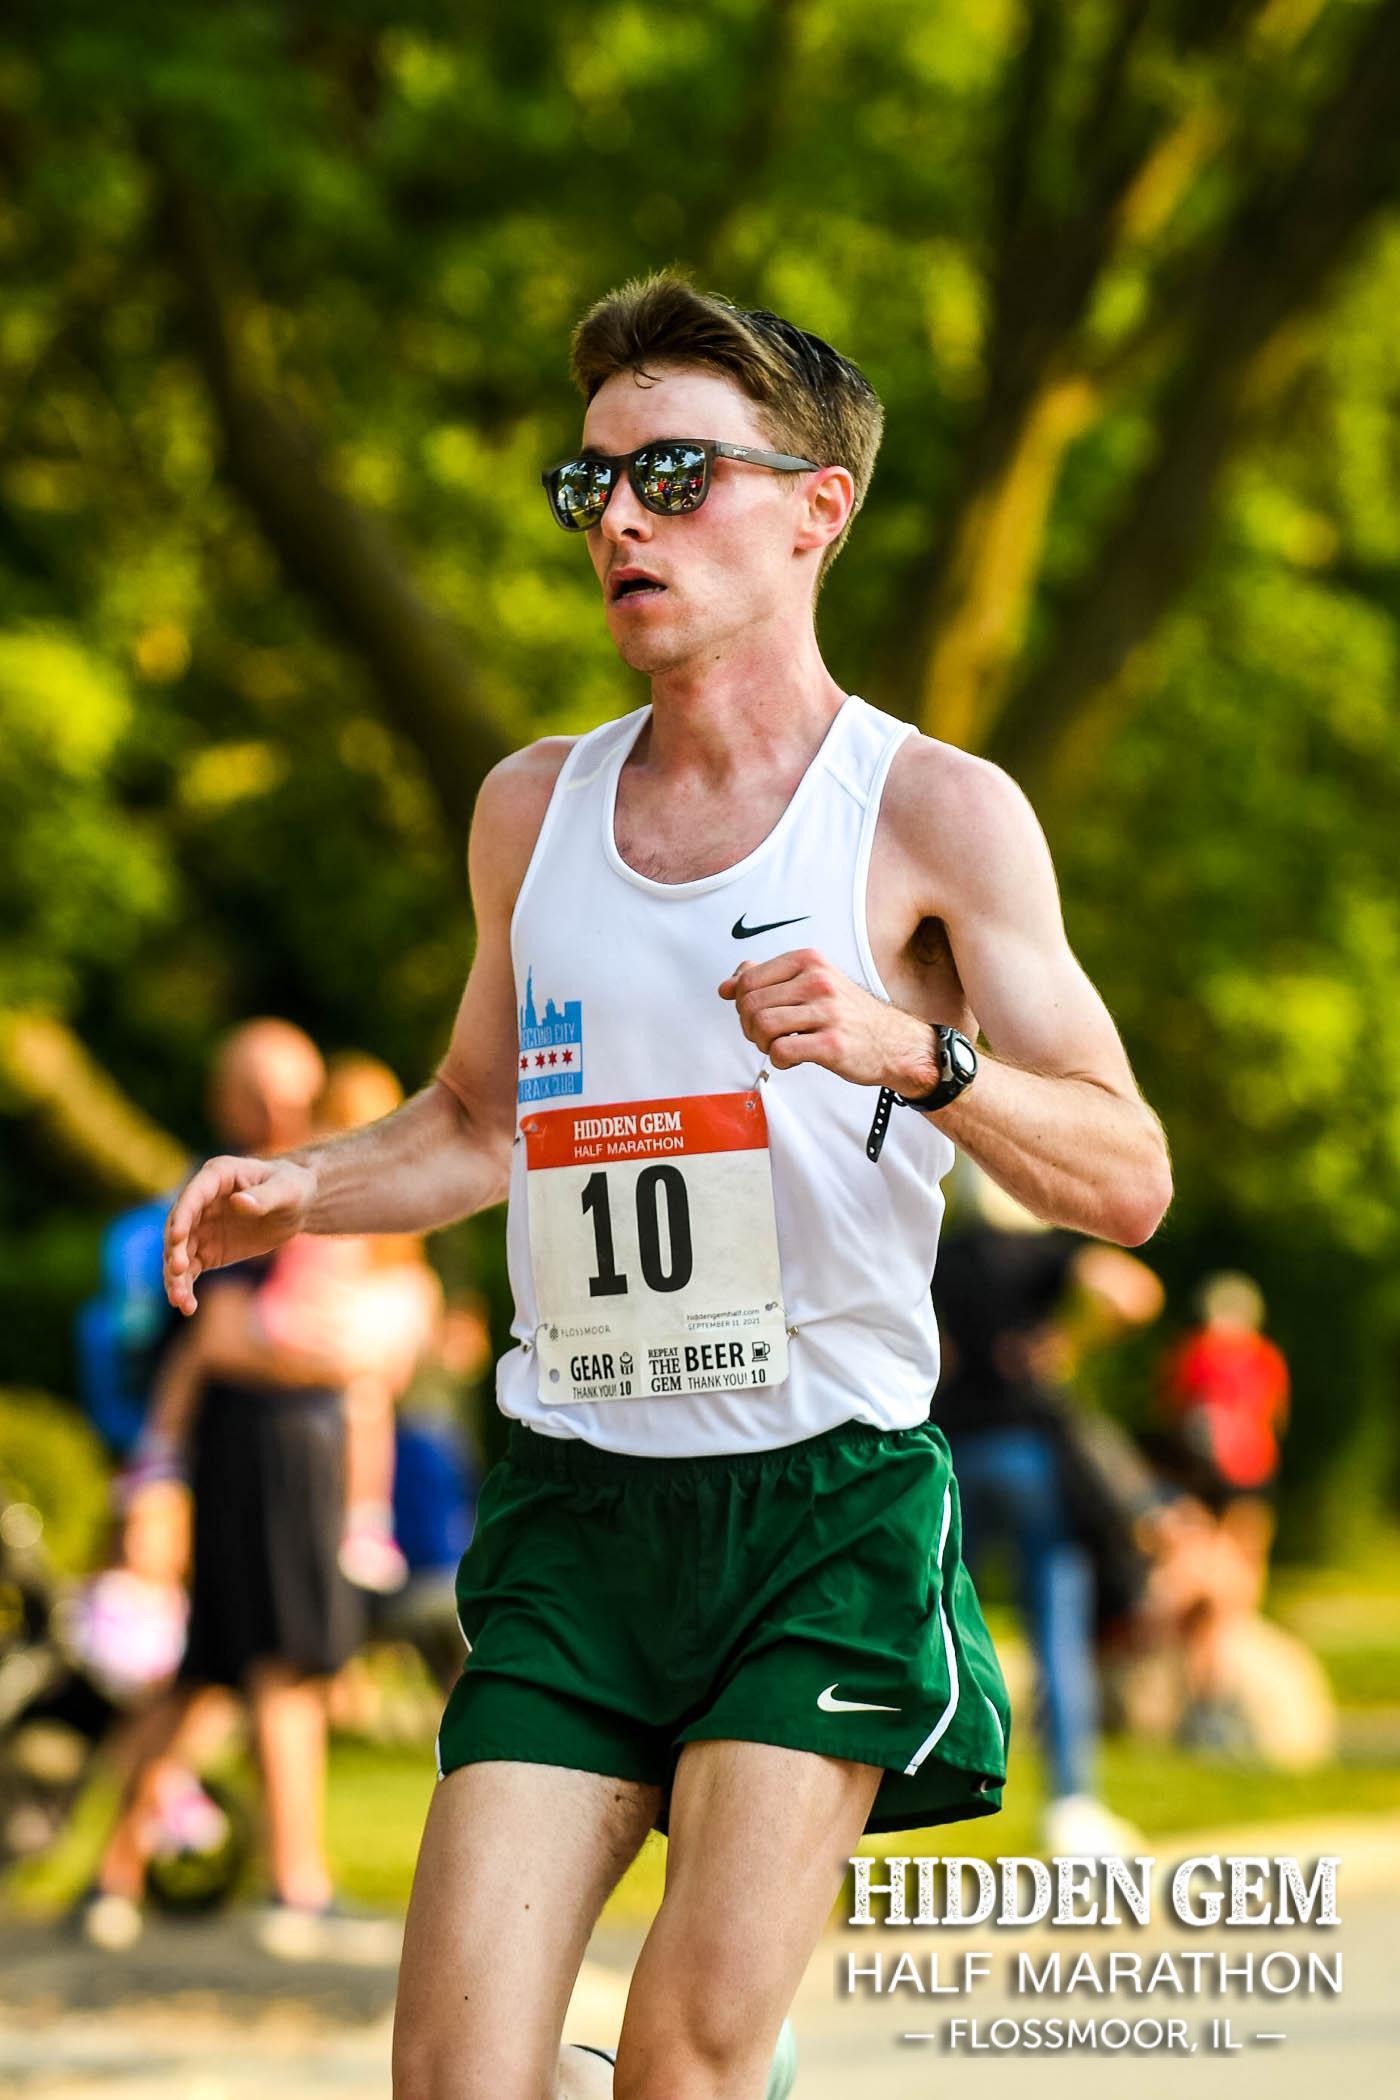
Even padding image
Example of even negative space around the runner. Notice, in this shot style, the spacing does need to be the same on the top as it is on the sides. You can disregard the bottom but ensure your crop is at knee level or above (preferably mid-thigh).
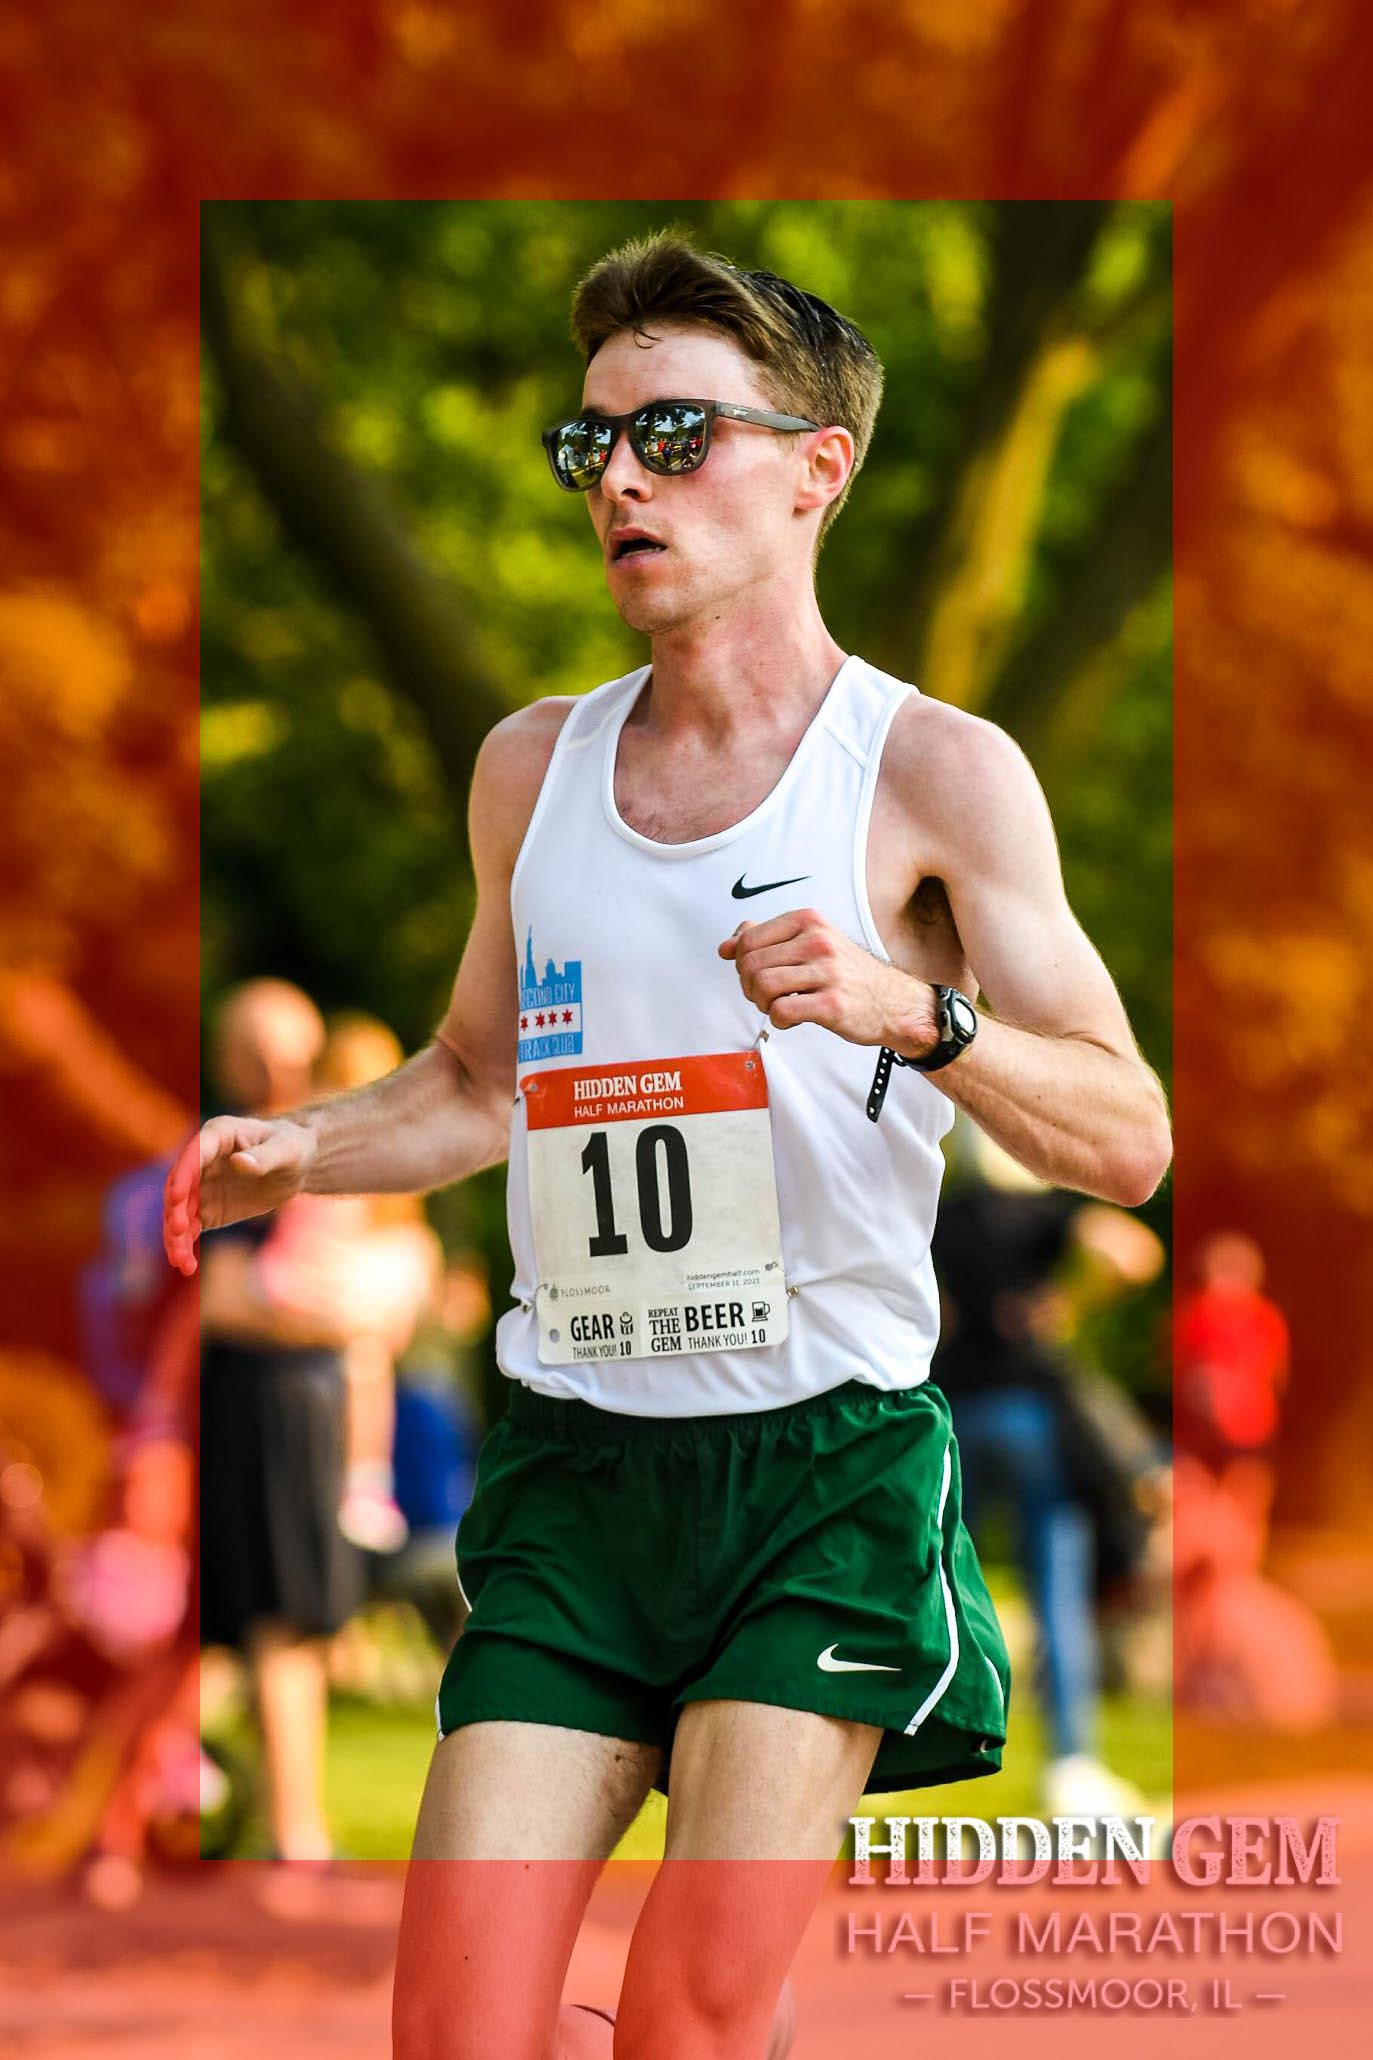
Even padding with measurements
With the measurement lines, it is easy to see that each side of the runner is roughly even distance from its respective side of the frame. The top of the runner's head is also almost exactly the same space from the top of the frame as the runner's arms from each side of the frame.
Level Horizons
Examples shouldn't be needed to demonstrate level horizons. Rather, just periodically check your shots to ensure your runners are vertically oriented. Remember, people and light poles, posts and tree trunks (generally) stand straight up. If people are tilting or anything else normally orthogonal to the ground is leaning one way or the other, recompose your shot.
** When shooting with a monopod or from a chair, it is easier to accidentally take crooked photos. This is because with your camera on a monopod, photographers tend to tilt their camera with the monopod planted, rather than translate/move to where they need to go. It is okay to use a monopod, just ensure you are leveling your horizons. The same applies to sitting while taking photos. It is okay to sit and take photos if the shot allows for it, but make sure that if you are planting your butt and leaning your upper body to take your photos, you are not tilting your camera in the process - tilting your camera is the natural action that will happen if you simply lean, so stay attentive to this matter.
Isolation
Isolation is essential to our shots. It's very easy to relax and not work that zoom ring, or zoom out when you see a clump of runners coming to try and get everyone. However, please remember to take your time, use that zoom ring, and isolate the subject before shooting that burst. You may miss some runners with this style, and that's okay. We want to ensure the shots we do take count. Do not be temped to loosen up the framing, zoom out and get many runners in a single frame.
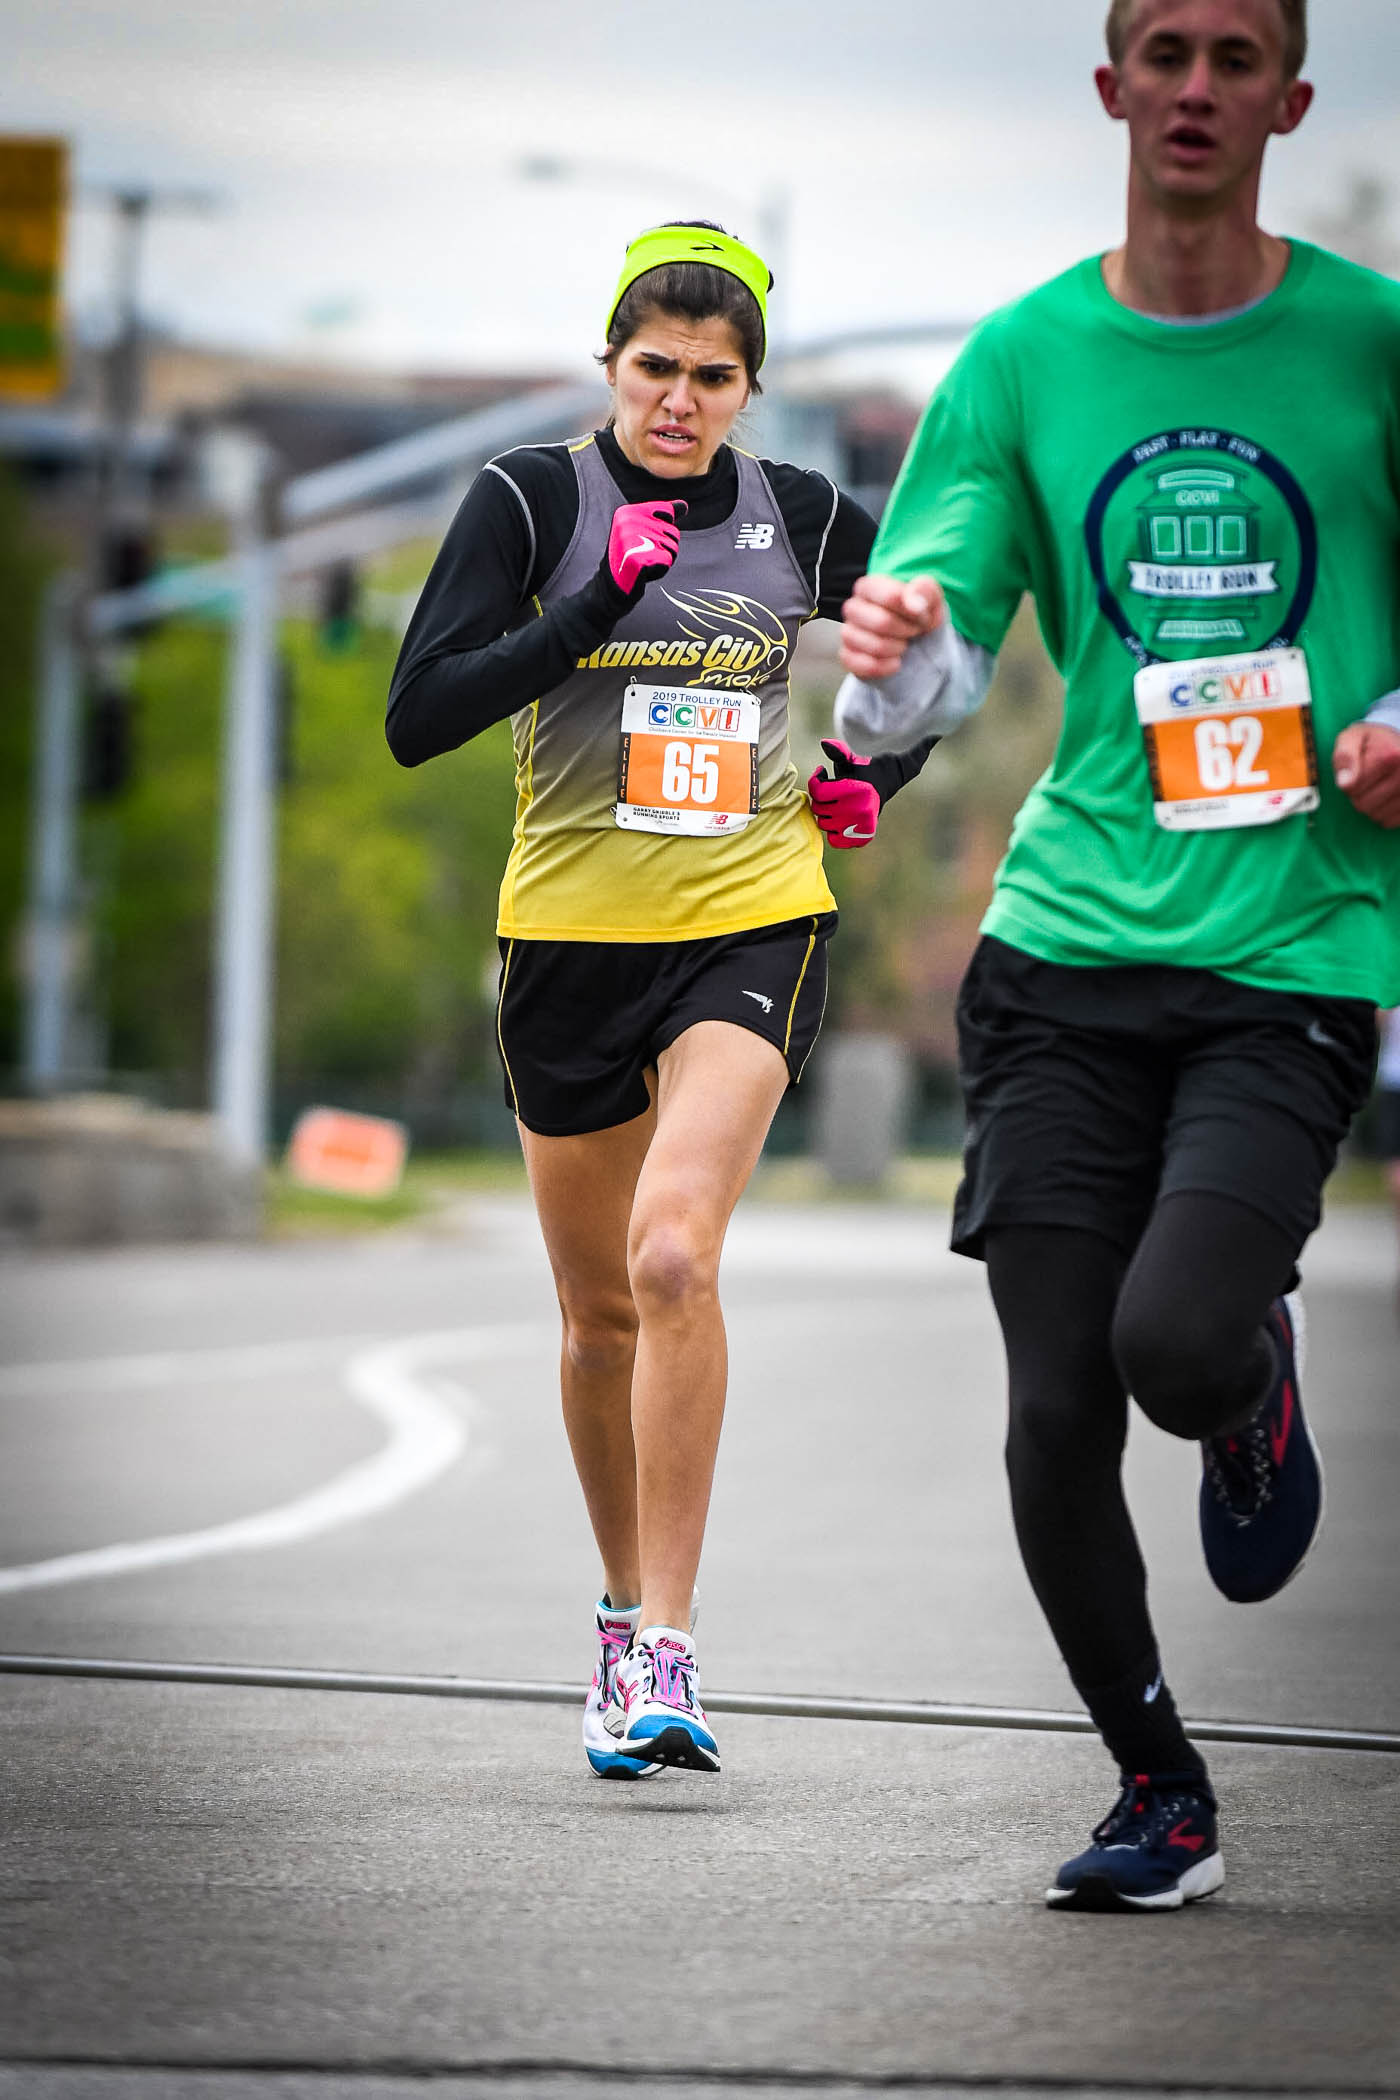
Proper Isolation Example
Example of EXCELLENT isolation. Notice how, despite this runner being incredibly close to another participant, and partially obstructed by the other participant, there is a clearly isolated subject. The shallow depth of field removes the prominence of the non-subject runner in the frame.
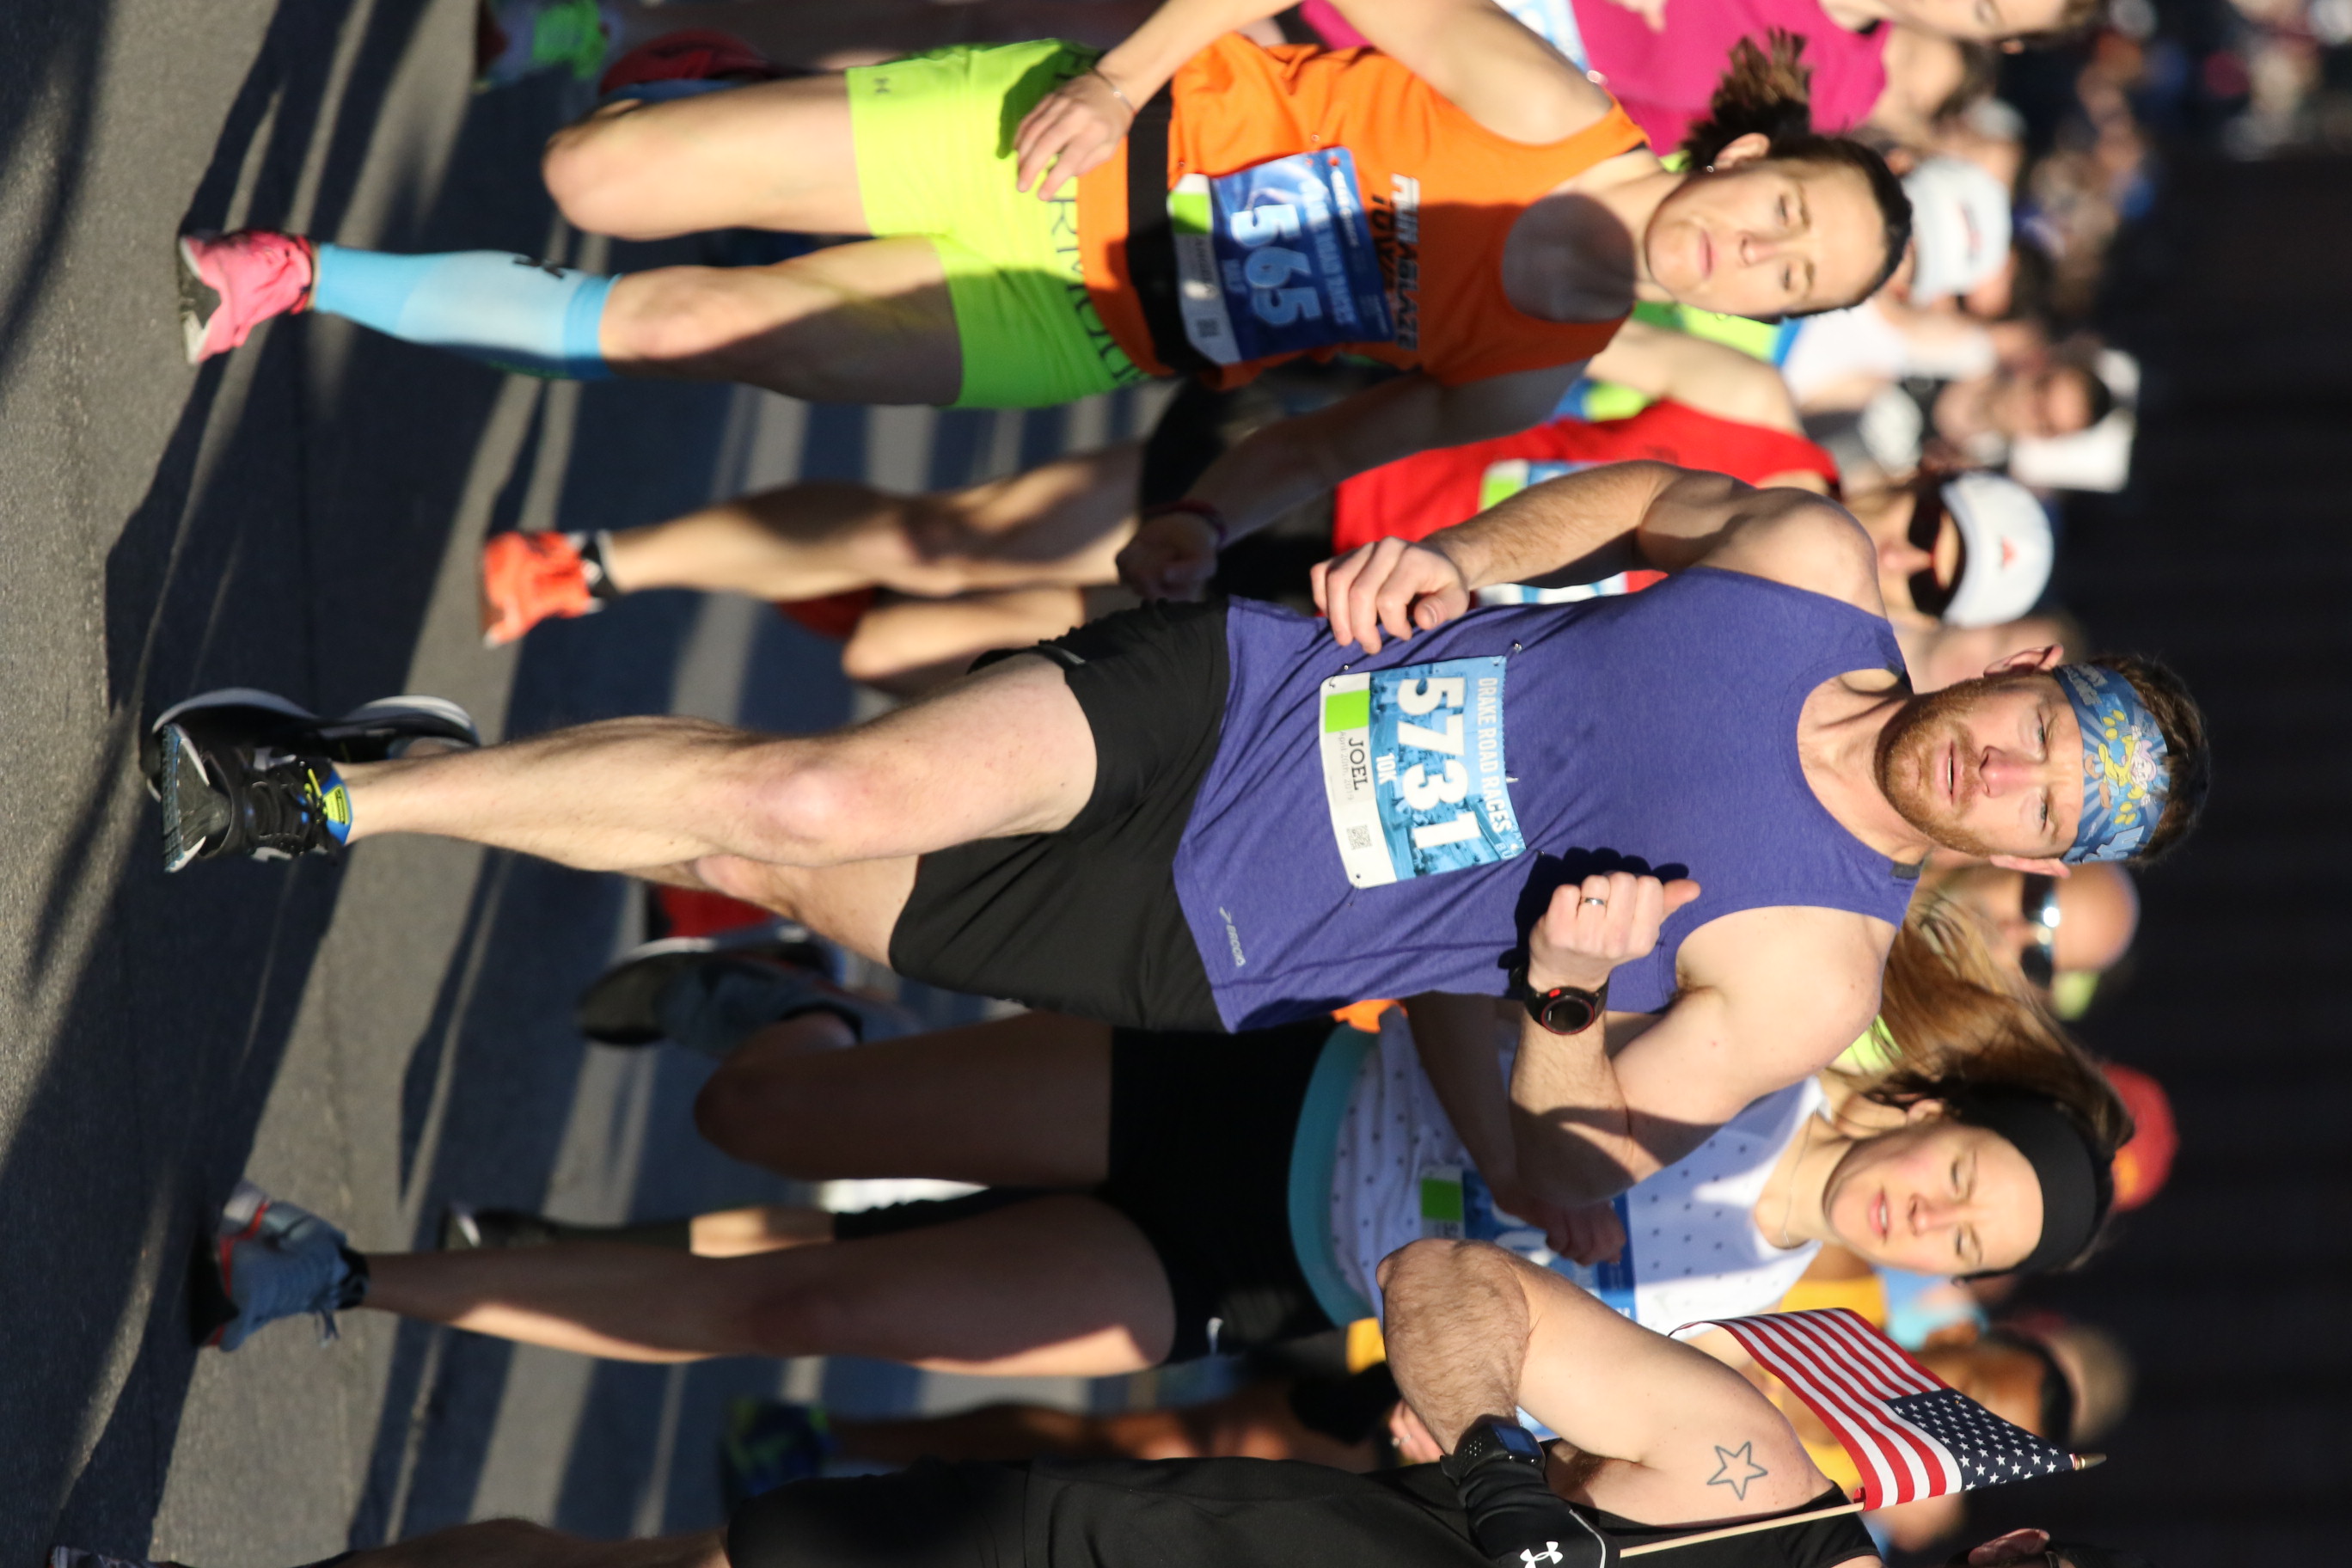
Proper Isolation Example
Another example of EXCELLENT isolation. Notice how the tight framing combined with a longer focal length and shallow depth of field really isolates a single runner in this image despite dozens being visible. In this case, proper framing combined with a longer focal length lead directly resulted in proper isolation.
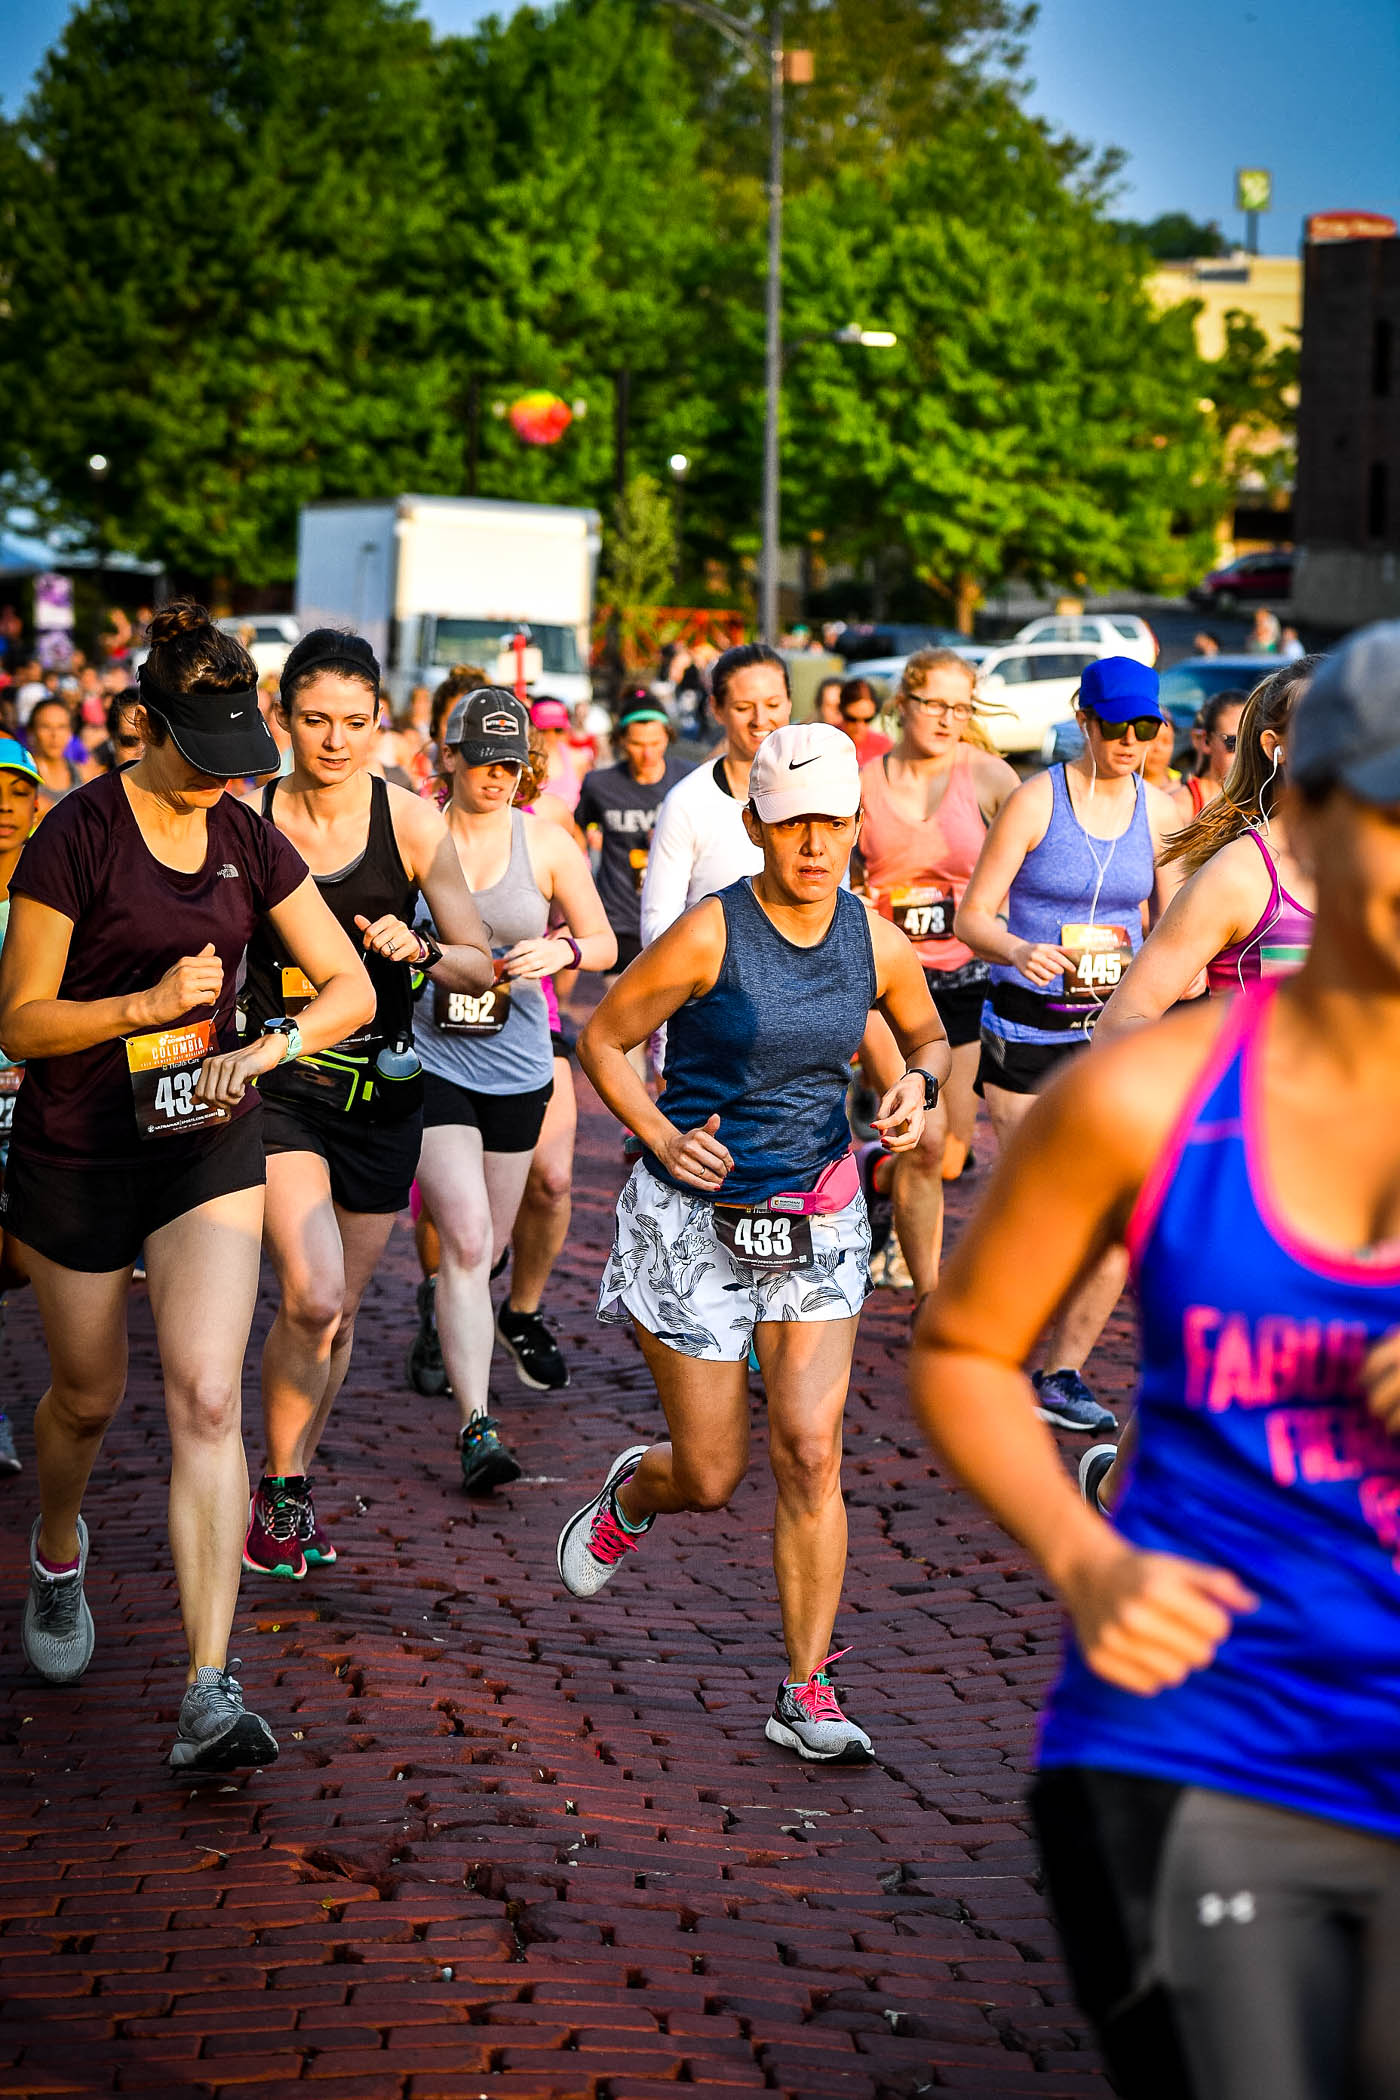
Incorrect Isolation Example
Example of improper isolation. Notice how the intended subject is almost lost in a sea of participants. While the subject is in focus, and properly exposed, this shot is orchestrated around participant bib #433, but participant #433 does not gain anything from the excessive negative space around them. The wide framing with excessive negative space weighted towards the top of the frame distracts the viewer from the subject. All that is needed to correct this shot is to tighten the framing up similar to the previous example.
Hopefully this is helpful in creating good photographs at our events. If you have any questions, concerns or comments, as always, please feel reach to reach out to your team leader or event coordinator.